| |
What’s Needed:
Windows Automated Installation Kit (WAIK) for Windows
Vista
A fast, 4GB or larger USB flash drive
An x86 or x64 based computer running Windows XP SP2,
Windows Vista, or Windows Server 2003 SP1 operating
system. This computer will be called the “Technician
PC”.
A PC with Windows Vista already installed.
A PC to install Windows Vista on (can be the same PC)
Assumptions
These instructions
are based on the Ultimate or Business versions of Vista
<enter> means press the Enter key
You know how to open an elevated
command prompt in
Vista
You have a basic understanding of ImageX and the WAIK
You have a basic understanding of DOS
Setting up the USB Flash
Drive 
1. 4GB USB
Flash Drive - Since you will be copying
the Windows Vista DVD to your flash drive, you will
need a flash drive larger than 2GB. The next size
up of flash drives is 4GB, so use one of these. The
Vista DVD is about 2.6GB in size and after you copy
it to your flash drive, you will still have plenty
of room for anything else you might need. Also be
aware that flash drives vary in quality and speed.
Don't just buy the cheapest one out there (you get
what you pay for). Look for a flash drive that has
a minimum of 15MB read and write speed. You can use
something slower, but then it will take longer to
do the install.
2. Install
the Windows Automated Installation Kit on
the Technician PC or the Windows Vista PC. A little
bit of a pain if you don't have this installed. You
have to download an image of the WAIK from MS, create
a DVD from the image (the same as creating a DVD
from an ISO file), then install it from the DVD.
You can download the WAIK
for Windows Vista here.
3. Setup your USB
flash drive with Windows Vista.
Note: the following is needed if your USB
Flash Drive is not formated as FAT32. If it already
is, you can skip
this step.
• Place the USB
flash drive in a USB port on the Windows Vista PC.
• Delete any files on the USB drive.
• Partition and format the USB flash drive using
Diskpart (next).
Note: According to the Windows PE documentation,
the following Diskpart commands must be done on a
Windows Vista PC. This is because Windows Vista Diskpart.exe
has the ability to see and use USB flash drives. Earlier
version of Diskpart do not.
(see Additional Notes below)
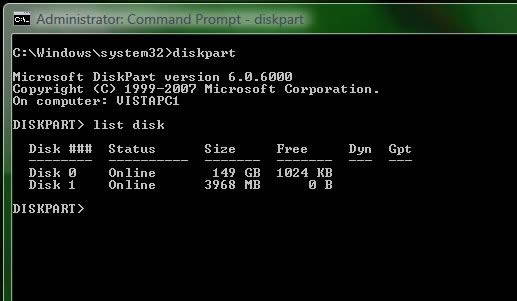
This set of commands assumes your USB flash drive is
detected as disk 1. You should double check this by
listing the disks before cleaning the USB drive. Open
a command prompt window and type the following commands,
pressing <enter> after each command.
• Diskpart
• List disk
(this command is important. It will show you what disk
your USB Flash Drive is. Most likely it will be Disk
1. You don’t want to format your C: drive !)
• select
disk 1
• clean
• create partition primary
• select partition 1
• active
• format fs=fat32
• assign
• exit
Copy Windows Vista to the USB Flash Drive
You will now have a partitioned and formatted USB flash
drive. All that is needed is to copy the files from
the Windows Vista DVD to your flash drive. Place the
Vista DVD in the DVD drive of your Vista PC. You can
close the install window if it opens. Open a command
prompt window and type the following command:
xcopy e:\*.* f:\ /e/h/f <enter>
The above assumes e:\ is the DVD drive and f:\ is
the USB flash drive. Change them as needed.
You now have a bootable USB flash drive
with Windows Vista ready to install from. (You should
have about 1.3GB of free space on the USB flash drive.)
Note: You will have to set your PC BIOS
to boot from a USB device in order to boot from
the Vista USB Flash Drive.
Creating
the Autounattend.xml file
1. You
now need to create the autounattend.xml file that will instruct
Windows Vista how to install itself. On the PC you
installed the WAIK, click Start > Programs > Microsoft
Windows AIK and choose the Windows System Image Manager
entry. WSIM is new to Windows Vista. It replaces the
Setup Manager that was used for previous Windows operating
system's unattended installations. Unlike System Manager,
WSIM does not have a wizard to get you started. At
first, using WSIM is a little daunting. There is so
much to choose from, multiple panes to look at and
rather mediocre documentation. You are going to have
to play around and experiment with this. The instructions
here will help you create a basic Vista unattended
installation.
2. If
this is the first time you are creating an autounattend.xml
file,
you will need to copy the install.wim file
from the Sources folder of the Vista Install DVD into
a folder on your technician computer's hard drive.
The install.wim file has all the images for Windows
Vista, and WSIM needs to know what version, or SKU,
you will be working with.
• Next, click File > Select Windows Image, which
opens a dialog box where you can navigate to the folder
you placed install.wim in, and then click Open. You
will be shown a list of all the Windows Vista images/versions
available in install.wim. Choose
the version you want to work with from the list. These
instructions are based on Vista Ultimate, but you could
also choose Vista Business. You will then be prompted
to create a Catalog file, choose Yes. The catalog file
is like an inventory of what is in the image. You
only have to choose your version and create a catalog
once. Subsequent use of WSIM will not prompt you to do
this as long as you are working with the same version/image
of Vista. If you want to work with another version of
Vista, you will need to go through the process again.
3. Now that you have
WSIM open, chosen a version of Vista, and a catalog
file has been created, you can create
your autounattend.xml file. The autounattend.xml
file will have all the instructions to install Windows
Vista, and the file must be named this. (WSIM will automatically
create a file named autounattend.xml.)
In the bottom left hand pane of WSIM, expand the Components
node. This section has all the "components" of
the unattended install. Depending on what you want your
unattended install to do, you choose the needed components,
from the Components list, to accomplish this. We will
do the following in this unattended install.
Note: Dark Blue lines are
required components. WSIM requires
a minimum
set of components and settings to run the
autounattend.xml file correctly. To see the actual components
and settings used, click
here to see the final
autounattend.xml file.
| Task |
Component -Preferred Pass |
• Set the language
used for the install
InputLocal=en-us
SystemLocal=en-us
UILanguage=en-us
UserLocal=en-us
SetupUILanguage subcomponent >
UILanguage=en-us
|
Microsoft-Windows-International-Core-WinPE -
1
|
• Disable Firewall=True - This is Only
for the WinPE Pass
• Enable Network=True - This is Only for
the WinPE Pass
• DiskConfiguration > Disk
Configure the
hard drive (partition and format)
Wipe all partitions from the HDD, create a 60GB
primary partition, format it as NTFS, set it to
Active.
(note: this can be configured to suit your
needs. This is just one way of doing it)
• OS Image > InstallTo - indicates
what disk# and partition# to install Vista to.
• UserData > User Name, Organization, Accept
EULA
• Enter Product Key (optional - the product
key determines what version of Vista you are installing.
ex. You can't install Vista Ultimate with a Vista
Business product key.)
|
Microsoft-Windows-Setup_neutral - 1
|
• Run a Regedit command to fix the Network
Location, Home / Work / Public (because there is
a bug)
Right click the Components heading, choose Insert
Synchronous Command to Pass 4 - Specialize. Type the following
into the Path field:
reg add "HKLM\SOFTWARE\Policies\Microsoft\Windows
NT\CurrentVersion\NetworkList\Signatures\FirstNetwork" /v
Category /t REG_DWORD /d 00000000 /f
All zeros means Home/Work.
All zeros with the last digit a 1, means Public.
This reg command will modify the registry with
the proper Network Location. Something that the
unattended installation fails to do.
|
Microsoft-Windows-Deployment_neutral - 4
|
• Since this PC will have a static IP address,
we will configure the DNS servers. If you want
2 DNS servers, you need to add the IpAddress sub
component
twice, one for each IP address:
Interfaces > Interface > DNSServerSearchOrder >
IpAddress > Key=1, Value=10.90.10.10
IpAddress > Key=2, Value=10.90.10.20
• If you want to use DHCP, you don't need
to add the TCPIP component or sub components. DHCP
will be used by default unless disabled.
|
Microsoft-Windows-DNS-Client_neutral - 4
|
• Configure some Internet Explorer settings
|
Microsoft-Windows-IE-InternetExplorer_neutral
- 4
|
• Tell Vista to skip Auto Activation (you
have plenty
of time after the install to activate).
There is only one setting here: SkipAutoActivation=True
|
Microsoft-Windows-Security-Licensing-SLC-UX_neutral
- 4
|
• Computer Name
• Time zone (right click, choose Help
to see the Time Zone names. ex. Eastern Standard
Time or Pacific Standard Time)
• RegisteredOrganization=Microsoft (do
not change this)
• RegisteredOwner=AutoBVT (do not change
this)
• Configure your Display settings
|
Microsoft-Windows-Shell-Setup_neutral - 4
|
Set the IP address, subnet mask and default
gateway (ridiculously complicated
and not documented.)
• Disable DHCP since we are using a static
IP Address: Microsoft-Windows-TCPIP
> Interfaces > Interface > Ipv4Settings > DHCPEnabled
= False
• The IP address and subnet mask are indicated
by a slash IP address, in the UnicastIpAddresses
> IpAddress subcomponent. Similar to what you would
see in a router configuration. /24 would equal
255.255.255.0. /16 would equal 255.255.0.0 and
so on.
ex.
10.90.10.36/24 would be:
IP Address = 10.90.10.36
Subnet mask = 255.255.255.0
• The default gateway IP address is entered
in the Routes > Route
subcomponent using the NextHopAddress setting. ex. 10.90.10.1.
I
don't think you need the metric parameter in the Route settings,
but it doesn't hurt if you do have it.
Identifier = 0
Prefix = 0.0.0.0/0
Look
at the autounattend.xml file
to see how all this is setup.
• If you want to use DHCP, you don't need
to add the TCPIP component or subcomponents. DHCP
will be used by default unless disabled.
|
Microsoft-Windows-TCPIP_neutral - 4
|
Disable Windows Defender. DisableAntiSpyware=True
(you can do better for anti-spyware)
|
Security-Malware-Windows-Defender_neutral - 4
|
Set the OOBE settings - more Shell
settings:
• HideEULAPage=true (Skip the EULA)
• NetworkLocation=Home (Fill this in,
but it doesn't work. See fix above)
• ProtectYourPC=1, 2 or 3 (using 3 will disable
automatic updates)
• SkipUserOOBE=true (Skip
the annoying Windows Welcome
Screen)
• RegisteredOrganiztion=Microsoft (do
not change this)
• RegisteredOwner=AutoBVT (do not change this)
• Create a local
user account and password that you can login with
when the install is finished. (note:
this is required even if you are joining the PC
to a domain).
(note: OOBE stands for Out Of Box Experience)
|
Microsoft-Windows-Shell-Setup_neutral - 7
|
4. Adding Components
in the autounattended.xml file
• You pick a component you need for your unattended install from the Components
pane and right click it.
• The right click menu will have one or more passes that you can add the
component to.
• You choose a pass from the menu and the component gets added to the answer
file pane in the middle of WSIM, under the pass you chose.
• You don't have to use every component or all of a component's sub components.
Just use the components/subcomponents you need. Likewise, you don't have to
fill in every available setting for every component. Just the ones you need
(and any required ones).
• Once the component is in the answer file pane, you click the component
to highlight it, and if applicable, in the right hand pane, will be some settings
that you can modify.
• Some components will have subcomponents (they will have a little plus
sign next to them) that you might need. These too can be added the same way.
Right click and choose the pass you want to add it to. (This is going to the
be same pass you added the parent component to.)
• Once you have all your components and settings chosen, you click File > Save
Answer File and an autounattend.xml file will be created for you. Windows Vista
uses this .xml file to configure itself during setup.
• You then copy the the autounattend.xml file to the
root of your USB flash drive you created earlier. Vista will automatically look for an autounattend.xml
file during install, and if one is found, in the root of the flash drive, Vista
will process it.
Note: When you save your answer file, WSIM
will Validate it for you. Look on the bottom right pane and you can
see if there are any problems with your answer file in the Messages pane. You
should check this and fix any problems. Some error messages are informational.
If you add a component, but don't configure any settings, the Validation will
tell you this. You can click on the error message in the Messages pane and
WSIM will show you where the problem is in the Answer File pane. Alternatively,
you can click on Tools > Validate Answer File to validate your answer file.
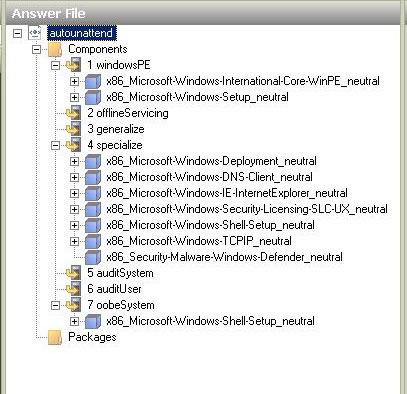
(Click image to enlarge
)

Below is what the complete list
of components will look like. You will notice
that only 3 of 7 possible passes were used for the
components. This is to be expected. Passes
are different phases of the Windows Vista installation. Some
components will have more than one pass to choose from,
some can only go in one pass, and some components
will be in more than one pass. It all depends on how
and when Vista processes the various components during
the install.
So how do you know what Components
to use and what passes to put them in? There
is no definitive answer for this. You have to familiarize
yourself with all the components. This might seem like
a big task, but many of the components and their subcomponents
are self explanatory, and some can only go in one pass.
Much of creating a successful autounattend.xml (and
sysprep.xml) is experimentation. I ran about 8 unattended
installs with 8 different autounattend.xml files
before I had a good, working unattended install. (Much
of this was trying to get the undocumented static IP
address information right.)
Where is the Help?
Much like creating
a WinPE CD (or USB flash
drive), Microsoft does not make the unattended install
process easy. However, there is context sensitive Help
throughout WSIM. Right click any component or subcomponent,
in any pane, and choose Help. Help will open for that
component. The Help is a little vague (typical MS)
but much of it will tell you what the component is
for and how to use it. The same goes for the settings
in the right hand pane. Right click a setting and choose
Help. Help will explain what the setting is and what
parameters to use.
You will have to do some reading - the WAIK help and
the WSIM help. You should also check out the Windows
Vista TechNet sites (links are below). It
will become easier after you use WSIM
for a while.
The hard part is working around the bugs.
What Bugs? - be prepared for things
to not work exactly as planned. There are some bugs
in the unattended installs. Some of them you can work
around, some not. Few are show stoppers (except not
being able to enter a Computer Name when it is deliberately
left out of autounattend.xml or Sysprep.xml - think
installing hundreds of PCs with different names) Hopefully,
when Vista SP1 comes out, or maybe before, we will
see an updated WAIK with less bugs, and maybe even
a Wizard front end. It would also
be helpful if any required Components and settings
were highlighted with a specific color so you knew
you needed to add/configure them.
Additional
Notes about Unattended Installs
• Using a quality USB flash drive to
run an unattended install is faster than installing
from a DVD or installing over the network, but there
is one thing you need to be aware of. A bootable USB
flash drive, unlike a bootable CD/DVD,
does not prompt you first to boot
from it. It will
just bootup and start the install. This is OK, but
be aware that the Vista install process will reboot
the target PC at least twice during the install. If
you do not remove the USB flash drive before the
PC reboots, the install will start over. You can remove
the flash drive as soon as Windows finishes copying
files from it very early in the install process. It
will not be needed again. DON'T forget to do this.
Alternatively,
you can add a Synchronous command in Pass 1 (WinPE)
to run a batch file that will pause the install and
tell the user Vista is about to be installed.
Click
Here for an example.
If you want to enable the
local Administrator account during
an unattended install, the easiest way is to add
a synchronous command in Pass 4 and then in Pass
7, set the Administrator password:
1. Right click "Components" at the top of the WSIM Answer
File pane.
2. Choose Add Synchronous command to Pass 4, Specialize
3. Enter this command in the command line box : net
user administrator /active:yes
4. In Pass 7, add the Microsoft-Windows-Shell-Setup
> UserAccounts >
AdministratorPassword component and enter a password
in the Settings. Entering
the password here will encrypt it so it can't be
seen in the answer file.
• Unattended installs in Vista are really only
meant to get your Imaging PCs setup. It is not the
preferred way to set up multiple PCs. Imaging, using
Sysprepped images and ImageX to create (capture) and
apply images, is now the preferred way to deploy Windows.
• There are some bugs in unattended installs (including
sysprep installs). You will just have to test them
to see where the problems are.
• WSIM is used to create both the autounattend.xml answer file for unattended
installs and the .xml answer file used with Sysprep. Note: these 2 files are
basically the same thing. They just have different names and Sysprep does not
use any Pass 1 components.
• Not every setting for every component needs a value. If you are not sure,
right click the setting and choose Help to find out more information about the
setting.
• The Windows documentation can be a little vague and even leave out important
info, like how to configure a static IP address.
• You don't have to include a product key in the autounattend.xml file,
but if you leave it out, you will have to accept the install screens saying
you don't want to enter a product key now, and then choose your version of
Vista screen.
• Vista requires a local user account be added during setup. Even if you
enable the local Administrator account, you will still have to add a local
user account or Vista will stop during the unattended install and ask you to
add one.
• The .xml answer files created by WSIM are very similar to HTML files.
Get to know the .xml answer files to better understand what is being done.
• What are Packages? Packages are additions to the Windows
Vista operating system. Games, Telnet Server, IIS Web Services, etc. can
be enabled or disabled. Generally, you can leave out any Packages and
Vista will install the standard Windows defaults.
• The WAIK for Vista documentation says you
have to run Diskpart on a Vista PC if
you are going to be making a WinPE bootable UFD,
or in this case, a bootable Vista install UFD. In
typical Windows documentation fashion, it doesn't
say why. This demand seemed
a little odd. Why
do you Have to
do it on a Vista PC?
I put my USB flash drive in a USB port
on a Win2003 SP1 32bit server. Opened a command
prompt and ran Diskpart. I then ran the Diskpart
command "list disk". It only showed
my local HDD, not the USB drive. My USB drive
was visible in Windows Explorer.
I then copied Diskpart.exe from a Vista Ultimate
32bit PC to the Win2003 server and ran it. I
received an error message: "This is not a
valid Win32 application", then "access
is denied". I
checked the permissions, and the logged on user
had full permissions to Diskpart.exe.
I then put the same USB flash drive on the Vista
Ultimate 32bit PC and ran Diskpart.exe. Sure
enough, the USB drive was now listed when the "list
disk" command
was run in Diskpart.
I can only conclude that Windows Vista Diskpart.exe
has the ability to see and use USB flash drives.
Earlier version of Diskpart do not.
|
|